I've had this pig oven mitt for forever. It has seen better days. So I decided to cut it apart and use it as a template for making a new dog oven mitt.
First, cut apart the old mitt on the seams.
Then I used the old mitt to applique together the top, bottom, and mouth of the new mitt.
Voila! A dog oven mitt. Complete with "I Woof You" instead of I love you message for Grandma.
Embroider name and year.
Sunday, December 9, 2012
Saturday, December 8, 2012
Oven Mitts take 2
My Mother-In-Law collects chickens. Because of this, my sons have sometimes called her "Grandma Chicken".
So I thought we'd honor that when making her Cheesy Christmas Present.
Cheesy Christmas Presents
Every Christmas I try to come up with new, cute, cheesy Christmas presents for the grandparents.
I've done personalized plates, personalized aprons, personalized watches, personalized bags...you name it. And now that my boy are 5, I'm running out of ideas. Oh no!
But, I have a few ideas left in me...because this year I came up with: Personalized Oven Mitts!
There are tons of tutorials on the web, but I just free-handed it. This is how I did it:
1. Drew a mitt and traced my son's hand in the middle.
2. For each side of the mitt, you actually have to cut out at least 3 layers: the outside, the lining, and the insulation. I just used some left over 100% cotton quilt batting, so I cut two layers of that. (They sell actual oven mitt batting that is more heat resistant, but I decided two layers of the cotton stuff would be fine for our purposes.)
3. Quilt the three layers together.
4. Add any embellishment (embroidery, applique, etc).
5. Bind the bottom of the glove. (I've seen the binding done two ways, like this, or at the end, after stitching the two sides together. I decided to try this way, because it looked easier.)
6. Once both sides are finished, lay both right sides together than stitch around.
7. Option, if you want to add a loop to hang it by, you need to add it right now. Remember, lay the loop part between the two right sides.
8. Pin around the edges. Then stitch around. And then cut the excess loop material.
9. Turn inside out and Voila!
If you let them pick out the material and the design, they will be so proud of the gift they've made for her!
Monday, October 22, 2012
The Fighter
One of my closest friend's grandmothers is fighting breast cancer. Over the last few years, my friend has been participating in many events to raise money for cancer research in honor of her grandmother's battle. She told me about a year ago that she was saving tshirts for me to make her grandma a pink ribbon tshirt quilt.
Last week she called me crying. They are stopping chemo.
She had only collected nine tshirts so far (and one slipper and one canvas apron belt), but she couldn't wait anymore...the quilt needed to be made.
Here it is.
In honor of Grandma G.
Mother, Grandmother, Fighter.
Maybe it bring her love, peace, and warmth.
Update: Sadly, my friend's grandma passed away last night. My heart is heavy for her loss.
Labels:
breast cancer,
grandparents,
pink ribbon,
quilt,
sewing,
tshirt
Saturday, September 8, 2012
Los Luchadores
I got my sewing machine back! Yay! A quick trip to the sewing machine doctor for a tune-up was just what it needed.
Within hours of having it home, my neighbor approaches me..."Could you make me some lunchador masks for a competition we are having at work?"
What's a luchador? You've seen Nacho Libre, right? (If you haven't, you need to! I ♥ Jack Black!)
A few hours later, she brought over bags of bright, colorful, and shiny fabrics along with some images of the kinds of masks she was looking for...and we started cutting and sewing.
And voilĂ ...a few hours later we had El Zorro de Plato (The Silver Fox), El Destructor (The Destroyer), and Megavatio (Megawatt...her work is an energy company :)
I think they turned out great!
Friday, August 17, 2012
Fall!
School started this week, which can only mean one thing: Fall is on its way!
I love fall! It is my absolute favorite season!
I love the light jacket weather, the falling leaves, the cool nights, wearing scarfs, drinking hot chocolate, going to football games (don't even like football, I just like going to the games)...and I LOVE Halloween!
Halloween is still 75 days away, but my mind is already racing with ideas for Thing 1 and Thing 2's costumes!
(An aside: My sewing machine is currently in the shop. Quelle dommage! But, it should be ready sometimes in September, so I should (knock on wood!) still have plenty of time!)
Before I think about the coming costume, I would like to review their costumes of past:
2007: Thing 1 and Thing 2
2008: Bert & Ernie
(This is definitely my least favorite costume, but they were 1.5 and really wouldn't have worn a wig, a hat, makeup etc...so we went very simple)
2009: Rock stars!
2010: Thomas the Tank Engineers
2011: Ketchup and mustard
So what do you think they'll choose to be this year?
They love playing Angry Birds on my phone...so maybe:
We could even get our new puppy into the fun...
They love Cars 2...so maybe:
Or
They loved watching the Olympics, so maybe...
Or on second thought, maybe I could get Superman to do this one! ;)
Whatever we choose, I feel like nothing can beat the ketchup and mustard. We got sooooo many people staring and complementing us on that one. It was so simple, yet original, and everyone loved it! (Props to Thing 1 and Thing 2, because they came up with the idea all on their own!)
Hmmm...about 60 days left to decide!
Update:
The boys decided they wanted to be dogs. Thing 2 wanted to be a "red dog" and Thing 1 wanted to be a "rainbow dog." Not my favorite costumes ever, but the boys loved them!
Saturday, August 11, 2012
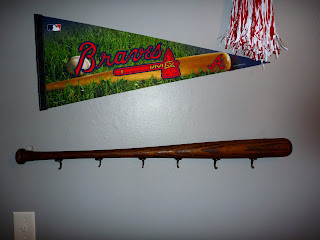
Baseball Bat Coat Rack
One of the first things I added to my Boys' Room Re-do Ideas pinterest board was this baseball bat coat rack from Potterybarn ($75):
We decided to make our own version.
1. I asked Superman's dad to dig in the basement for one of his old wooden bats. He brought me a very old one with a small crack in the back (making it unusable). The color was not great, so I cleaned it really well, then put a quick coat of stain on it from just a random can we had in the garage. ($0).
You could choose to spray paint if you want a bolder color.2. Then we ran to Menards and picked up some all purpose hooks: three packages of 2 hooks at $4 each. ($12)
And a pack of hangers from the picture hanging sections. ($3).
3. Then we measured out then drilled 6 holes evenly across the bat. Then we screwed the all purpose hooks in. (We did have to cut down two of the hooks for the skinniest area/handle of the bat.)
4. Then we attached the hangers (show above) on the back.
5. The hung the bat.
6. Then hung the boys' robes and towels on their new baseball bat coat rack!
Voila! Total cost: $15. Total time to make: about an hour.
Saturday, August 4, 2012
Removable TShirt Throw Pillows
Hi! Remember me?
Since my last post, I....
- finished my online class
- took a vacation to Myrtle Beach
- went school supply shopping
- have been watching lots of Olympics
- am trying to enjoy the last days of summer by spending a lot of time at the pool!
Unfortunately, that means I haven't had a lot of time to craft. Actually, my craft table became the "pile everything here that needs to eventually be dealt with" spot, and for about two weeks I couldn't have told you what color it was...but this morning I finally cleared it off! Yay!
Todays project: Tshirt throw pillows to match their quilts.
A few weeks back, Superman happened on a box of miscellaneous baseball tshirts in the basement. At the time, I was actually a little ticked off, since I had actually had to go to goodwill and buy extra tshirts in order to make the quilts the right sizes. He found enough shirts that I wouldn't have needed the goodwill shirts! Which upset me because #1 I wouldn't have had to pay for those shirts (sure they were $1-$2 a piece, but that adds up!) and #2 I had wanted as much of the quilt to be authentically OUR shirts as possible. But oh well...he suggested I make ANOTHER baseball quilt to take to the minor league games with us (for sitting on in the outfield) which would actually be good advertisement if I really want to start selling them.
But, before I did that, I wanted to pull two out and cover the throw pillows from their old beds.
Here's how they came out...
I've made tshirt throw pillows before, but not removable covers. I've since decided I should only ever make them removable...because, um, I have kids! So these are removable.
I was going to write a whole tutorial on how to make this, but a quick google search and I found this great tutorial which is very similar to what I did. So, I decided not to reinvent the wheel. :)
But I will add the two things I did differently, that I would suggest if you are making one out of tshirts.
1. Quilt the top. Tshirts (especially if they've been worn) can be pretty thin, so I quilted mine with some scrap white jersey I had and some super light batting.
2. Double up the flaps. In the tutorial given, her flaps are a single layer with a hem...I actually double mind up, so that they were sturdier.
I can't wait to post some pictures of the finished room soon!
Monday, July 9, 2012
Trading Spaces Myself
Once I decided it was time to re-do my boys bedroom, changing it from the fish/underwater theme we'd had going on since their nursery, to a more little boy-ish baseball room, I've been pinning ideas like crazy onto my Boys Room Re-do Ideas board on Pinterest.
One of the things I really wanted to do was this:
But #1 Superman was not excited about drilling a hole in a ball ("it will unravel...blah...blah...blah...excuse...blah...blah...blah") and #2 the longest dowel I could find at Lowe's was 48" and Thing 1 and Thing 2's windows are 45.5 (add the bracket and what you insert into the ball, and trust me it wasn't long enough.
I started looking into other curtain rods, but I wasn't impressed with the quality (read: sturdiness) or the price of the ones out there. This one from Sears.com was 19.99 a piece plus shipping, and look how thin the actual rod is! My boys would break it with one tug of the curtains.
Then inspiration hit. I went on to Lowes.com and found these plain white curtain rods for $11.66 a piece. Solid wood with 1 1/8 inch barrels. And pick up from the store was free. And the rods were ready for pick up 20 minutes later.
I brought them home and put them up. They fit perfectly!
Next step: decide on curtains. (These are just placeholders until I find what I really want.)
One of the things I really wanted to do was this:
http://sassyscarlett.blogspot.com/2011/01/baseball-curtain-rod.html |
I started looking into other curtain rods, but I wasn't impressed with the quality (read: sturdiness) or the price of the ones out there. This one from Sears.com was 19.99 a piece plus shipping, and look how thin the actual rod is! My boys would break it with one tug of the curtains.
I brought them home and put them up. They fit perfectly!
Then I pulled them back down and using a red sharpie marker, I free-handed stitching around each round finial.
And voila!! They look fab, if I may say so myself! :)
Next step: decide on curtains. (These are just placeholders until I find what I really want.)
Subscribe to:
Posts (Atom)