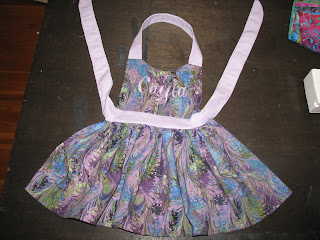
What you'll need:
|
|
||||||
| Step 1: Figure out what size apron you want to make. I am making a toddler sized apron, so I used one of my son's as a template for the right size. |
|
||||||
| Step 2: (Optional) If you are going to embroider the name, I suggest doing it before cutting the bodice from the fabric. That way you can make sure you cut it it around the name, perfectly centered. |
|
||||||
| Step 3: If you are making a child's sized apron, cut out and iron flat:
|
|
||||||
| Step 4: Right sides together, sew each one of the waist rectangles to each one of the bodice rectangles. |
|
||||||
| Step 5: Pin the bodice/waist combination right sides together, making sure that the waists line up exactly. |
|
||||||
| Step 6: Before completing this next step, you'll want to sew together the neck strap (two 2" x 15" rectangles) right sides together. Then flip right sides out and sew flat. I like to fold the bodice in half and cut up a slight curve on the side (I fold it in half so both sides match). Then I cut a slight curve for the neck. (Make sure what's left for the shoulder area line up with the neck strap. See picture.) |
|
||||||
| Step 7: Sew up both sides of the bodice first. Then before you sew the top (neck/shoulders area), you'll need to pin the neck strap so that it lines up where it will come together with the bodice. Remember that you you need to pin it inside because the bodice is currently inside out. And, you'll want to make sure the it isn't twisted, so when you do flip the bodice right side out it will lie flatly around the neck. See picture. Then, carefully sew across the top, including where the straps meet the shoulders and the curve of the neck. Then flip right side out and iron flat. Only the bottom waist portion of the bodice should still be unsewn. |
|
||||||
| Step 8: To prepare the skirt you'll need to start by doing small hems on both sides and the bottom. First fold over over 1/4 inch and iron. Then fold over 1/4 inch again and iron again. Then straight stitch down the hem. (I complete both sides first, then the bottom.) To gather the top of the skirt, I use my ruffler foot. However, if you don't have a ruffler foot (um, you should buy one, you can find them for less than $20), then you can just gather them as you pin them to the bodice. |
|
||||||
| Step 9: Since you will be able to see the seem between the bodice/waist and the skirt, I suggest attaching them using either a serger or a french seam. For this tutorial, I'll assume you don't have access to a serger (they are much more than $20), so I'll show you how to do the french seem. First, pin the wrong sides together and sew. Then, flip the apron over, pinning the right sides together and sew. This will leave a nice clean seam in the back. Your apron is almost done! You just need to add the belt ties. |
|
||||||
| Step 10: To finish the belt ties, sew right sides together on three sides (one short and the two long sides). I like to curve my short side, giving them a ribbon-like look. Turn the ties inside out and iron. Optional: Top stitch (sew on top of the finished sides) to make the ties stay flat, instead of poofy after a wash. |
|
||||||
| Step 11: Fold down twice the ends (hiding the open seam) and then pin to the waist so that it attaches on the back/inside. Then sew. Hint: I like to make sure that the curves of the belt ties are both on the bottom of the ties when I attach them, for continuity. Don't be afraid to reinforce this sewing by going back over it a few times. These ties will be pulled on and need to be really well attached! |
|
||||||
| That's it! You are finished! Here is the front. |
|
||||||
| Here is the back. |
|


