Showing posts with label children. Show all posts

Saturday, March 23, 2013

Dress Apron Tutorial

Back in January, I had a giveaway contest for a little girl's dress apron. I announced that the winners were Rachel and Amanda. Rachel let me know right away what apron she wanted. However, Amanda was waiting for just the right moment, which was just this past week. I decided while making Amanda's apron that I would take pictures as I went so that I could make a quick tutorial for anyone who wants to learn to make their own. I hope you enjoy...


What you'll need:
  • a sewing machine with embroidery unit (embroidery optional)
  • embroidery hoop (optional)
  • tearaway stabilizer (optional)
  • 2 coordinating fabrics
  • thread
Supplies
Step 1:

Figure out what size apron you want to make.

I am making a toddler sized apron, so I used one of my son's as a template for the right size.
Step 1
Step 2: (Optional)

If you are going to embroider the name, I suggest doing it before cutting the bodice from the fabric. That way you can make sure you cut it it around the name, perfectly centered.
Step 2
Step 3:

If you are making a child's sized apron, cut out and iron flat:
  • two 6.5" x 10" rectangles for the bodice
  • one 11" x 44" rectangle for the skirt
  • two 2.5" x 12" rectangles for waist
  • two 2" x 15" rectangles for the neck strap
  • two 2" x 18" rectangles for the belt ties (not pictured)
Step 3
Step 4:

Right sides together, sew each one of the waist rectangles to each one of the bodice rectangles.
Step 4
Step 5:

Pin the bodice/waist combination right sides together, making sure that the waists line up exactly.

Step 5
Step 6:

Before completing this next step, you'll want to sew together the neck strap (two 2" x 15" rectangles) right sides together. Then flip right sides out and sew flat.

I like to fold the bodice in half and cut up a slight curve on the side (I fold it in half so both sides match). Then I cut a slight curve for the neck. (Make sure what's left for the shoulder area line up with the neck strap. See picture.)
Step 6
Step 7:

Sew up both sides of the bodice first.

Then before you sew the top (neck/shoulders area), you'll need to pin the neck strap so that it lines up where it will come together with the bodice.

Remember that you you need to pin it inside because the bodice is currently inside out. And, you'll want to make sure the it isn't twisted, so when you do flip the bodice right side out it will lie flatly around the neck. See picture.

Then, carefully sew across the top, including where the straps meet the shoulders and the curve of the neck.

Then flip right side out and iron flat.

Only the bottom waist portion of the bodice should still be unsewn.

Step 7.1
Step 7.2
Step 7.3
Step 8:

To prepare the skirt you'll need to start by doing small hems on both sides and the bottom.

First fold over over 1/4 inch and iron. Then fold over 1/4 inch again and iron again. Then straight stitch down the hem. (I complete both sides first, then the bottom.)

To gather the top of the skirt, I use my ruffler foot. However, if you don't have a ruffler foot (um, you should buy one, you can find them for less than $20), then you can just gather them as you pin them to the bodice.

Step 8.1
Step 8.2
Step 9:

Since you will be able to see the seem between the bodice/waist and the skirt, I suggest attaching them using either a serger or a french seam.

For this tutorial, I'll assume you don't have access to a serger (they are much more than $20), so I'll show you how to do the french seem.

First, pin the wrong sides together and sew.

Then, flip the apron over, pinning the right sides together and sew.

This will leave a nice clean seam in the back.

Your apron is almost done! You just need to add the belt ties.

Step 9.1
Step 9.2
Step 10:

To finish the belt ties, sew right sides together on three sides (one short and the two long sides). I like to curve my short side, giving them a ribbon-like look.

Turn the ties inside out and iron.

Optional: Top stitch (sew on top of the finished sides) to make the ties stay flat, instead of poofy after a wash.
Step 10
Step 11:

Fold down twice the ends (hiding the open seam) and then pin to the waist so that it attaches on the back/inside. Then sew.

Hint: I like to make sure that the curves of the belt ties are both on the bottom of the ties when I attach them, for continuity.

Don't be afraid to reinforce this sewing by going back over it a few times. These ties will be pulled on and need to be really well attached!
Step 11
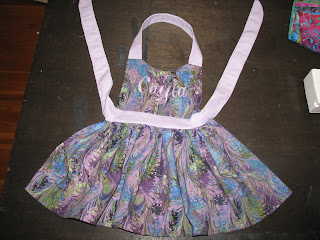
That's it! You are finished!

Here is the front.
Front
Here is the back.
Back

Friday, October 28, 2011

Up-Cycled Sweater Dress version 2.0

Okay, I forgot to take a photo of the before.  But this was a big bulky sweater with a HUGE turtleneck.  I was able to cut it down and make the neck more like a mock-turtleneck.  It ended up being pretty short (it'd been badly shrunken), but it will still make for a great long sweater over a pair of itty-bitty skinny jeans!

Then I crocheted a rose for the shoulder.  Adorable!


For the record, Thing 1 will be a great model one day.  He is not picky about what I put on him!

Update:  Here is a picture of the actual little lady the sweater was made for with her wearing it!  Doesn't she look darling.

Tuesday, October 25, 2011

Up-cycled Sweater Dress

So, like many crafters, I have developed an obsession with Pinterest.com.  I am so overwhelmed sometimes with good ideas that I'm finding myself working on multiple projects at once.

Last night I was cleaning out/re-organizing my bedroom closet and I came across a few cute sweaters that no longer fit.  Actually, they no longer fit for two reasons.  #1 I have gained weight (duh!) and #2 they've been dried (read: shrunken!).  I've been holding on to them because they are cute and I was holding out hope that if I lost enough weight, that they'd eventually fit again.  But at this point, I've decided to give up the ghost and just get rid of them.

But wait, I remember pinning something into my "If I had a little girl" board on pinterest where a woman does a tutorial on how to turn an old sweater into an a-line toddler dress.

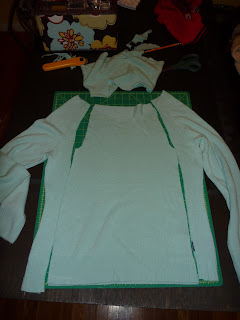
Following the instructions (and using one of Thing 1 & Thing 2's 3T long sleeve shirts), I was able to make a super cute and soft sweater dress for one stylish little Lady Bug.

The sweater before:


Cutting the shape of the dress out:

The dress after:

Thing 1 is about the same size as the Lady Bug, so I made him try it on for me.  He was happy to help.

Do you think he'll hate me for this one day?

I made a few mistakes along the way, but besides the arms being a tad short, I think it turned out great.  I'm ready to try making another one with my other sweater.  And it's not a cowl neck, so it should be easier.

Sunday, October 9, 2011

Ketchup catch-up

Thing 2's ketchup costume is finished!

One I finished making the labels (materials: felt, hot glue gun, and puffy paint), I just had to make the actual bottle shape.


I didn't have a pattern, so I literally laid my little ketchup kid down on the felt and did a police outline of his body.


Unfortunately, my ketchup kid (Thing 2) wasn't being very cooperative after the initial measurements, so luckily I had a clone happy to step in for the "fittings".


Finished product.

I plan on having Thing 2 wear a red shirt under the costume.  I'll have to have a long sleeve one on stand-by in case it gets cold.  No jacket is going on over this costume!


And, I've already finished the labels for Thing 1's mustard costume.


Seriously, I love Halloween!  When Steve Jobs tells the world to follow your passions, I think to myself "Self, why can't you find a job where you get paid to make Halloween costumes all year long?" :)

Tuesday, May 17, 2011

I like to plan ahead...


Superman actually enjoys last minute shopping.  He gets a thrill out of going to the store and having to find "the perfect gift" in five minutes flat.  Unfortunately, more often than not it is the leftover gift...the gifts that no one else wanted.  Which is why I like to plan ahead.  If my gift is a fail, it is rarely for lack of trying.

Which is why Mother's Day has just passed, and I'm already thinking of the next holiday...Father's Day. On Mother's Day, I got my mom a "4 Reasons I Love Being a Grandma" shirt from PersonalizationMall.com, and for just $3 extra I was able to add a personalized card which I thought was a really cute and unique touch.

So, for Father's Day, I decided to head on over to another of my favorite websites, Shutterfly.com to order up a few personalized cards for Superman and the grandpas.  Right now, you get 20% off of all cards, plus free shipping on orders over $30.

I was able to fill up the cart with a bunch of things I needed printed and a few other upcoming gift necessities to get my free shipping.  (I have an unnatural need to never pay for shipping!)

The trick is you have to order these far enough ahead of time that you can wait the 7-10 days delivery time for the free shipping items.

Check out the card I made for Grandpa Train.  It maybe the only picture of him and Grandma Train with all of their grandkids.  I think he is going to LOVE it!

And, if you make a project and share it in your blog (like I have here), you'll get a code for $10 off your next purchase.