Showing posts with label crafts. Show all posts

Tuesday, January 15, 2013

Fabric Heaven

I have never been much of a fabric hoarder. I have typically been a buy-as-I-go fabric gal.

But last weekend, my pastor's wife gave me 5 large trash bags of old fabric she'd been collecting but didn't want/need anymore. I spent Monday (had the day off because school was closed) organizing it.

I have to say, I'm enjoying having a closet full of fabric so much that I haven't even closed the closet door since I put it all in there.


I even organized the scraps into Joann-style fat quarter folds!


Sunday, December 9, 2012

Oven Mitts Take 3

 I've had this pig oven mitt for forever. It has seen better days. So I decided to cut it apart and use it as a template for making a new dog oven mitt.

First, cut apart the old mitt on the seams.

Then I used the old mitt to applique together the top, bottom, and mouth of the new mitt.


Voila! A dog oven mitt. Complete with "I Woof You" instead of I love you message for Grandma.

Embroider name and year.


Saturday, December 8, 2012

Cheesy Christmas Presents

Every Christmas I try to come up with new, cute, cheesy Christmas presents for the grandparents.

I've done personalized plates, personalized aprons, personalized watches, personalized bags...you name it. And now that my boy are 5, I'm running out of ideas. Oh no!

But, I have a few ideas left in me...because this year I came up with: Personalized Oven Mitts!

There are tons of tutorials on the web, but I just free-handed it.  This is how I did it:

1. Drew a mitt and traced my son's hand in the middle.


2. For each side of the mitt, you actually have to cut out at least 3 layers: the outside, the lining, and the insulation. I just used some left over 100% cotton quilt batting, so I cut two layers of that. (They sell actual oven mitt batting that is more heat resistant, but I decided two layers of the cotton stuff would be fine for our purposes.) 
 

3. Quilt the three layers together.

4. Add any embellishment (embroidery, applique, etc).

5. Bind the bottom of the glove. (I've seen the binding done two ways, like this, or at the end, after stitching the two sides together. I decided to try this way, because it looked easier.)

6. Once both sides are finished, lay both right sides together than stitch around.
 

7. Option, if you want to add a loop to hang it by, you need to add it right now. Remember, lay the loop part between the two right sides.

8. Pin around the edges. Then stitch around. And then cut the excess loop material.
 9. Turn inside out and Voila!


If you let them pick out the material and the design, they will be so proud of the gift they've made for her!

Monday, May 7, 2012

Tooth Fairy Pillow

I hadn't made a tooth fairy pillow in a while.  But last week someone ordered one off of Etsy.com.  If you don't follow my shop yet, you should! 

Front:

Back:


Monday, April 9, 2012

Chi Omega Quilt: Completed

As I mentioned before, I've been working on a college/sorority tshirt quilt for one of my Chi Omega sisters.  Well, it's finished!

Katie sent me 33 t-shirts (actually, I think it was 8 sweatshirts and 25 tshirts!) and her White Carnation formal gown to make into a quilt.

The final dimensions came out to 84 inches long x 68 inches wide.


ODU Sweatshirt.  Go Monarchs!


One of Katie's baby shirts.


Chi O forever.


Another shirt from when Katie was a kid.


Close up of some free motion quilting.


Katie asked that I include a block that shows that this was made by one of her sorority sisters.  I thought the white carnation was a subtle touch.


The back.  I chose a blue back with silver trim, because those are ODU's colors.


Close ups of the back view of the free motion quilting.


I hope she loves it and cherishes it for years to come!

Update:  Katie loves her quilt!

Saturday, March 31, 2012

Chi Omega Quilt

About a month ago, one of my Chi Omega sisters saw my college quilt on Facebook and said: "Ew, would you make one for me?!"

Then a few weeks later, I received two boxes of tshirts in the mail.

It was really fun working with Katie's shirts because there were so many that I remembered!  Some were shirts I had myself and had put into my own quilt (like the bid day shirt from the rush where Katie officially became a New Member (aka Pledge)) and some were just shirts I can vividly remember her wearing in college.

But Katie likes to keep me on my toes, so she sent not only her favorite tshirts, but a few sweatshirts, and her White Carnation formal gown!!  It was fun (and a little challenging) to work with the jersey material with the sweatshirt material and satin and lace.

The top is now all sewed together.  The next step is finding the perfect backing material, and then quilting!

Click to enlarge

Sunday, March 25, 2012

Craft Room Upgrade

So, when I originally designed my craft room, this was my inspiration:


Now, since I didn't have a window on the area of the wall where my main shelves would go, I had to improvise and decided to put a dry erase board there, as you can see in my pics from the post about the ribbon organizer project.


The thing is, I NEVER use that whiteboard!  Never.  I think Thing 1 and Thing 2 have drawn on it more than I have.

So, I decided I wanted to replace it with something more functional...a peg board.

I went to Lowe's and was able to find a 2 ft x 4 ft pre-cut peg board (otherwise they came in HUGE sheets!) for $5.  I also picked up a 47 pc assortment of peg hooks for $9.

The pegboard was a brownish color, so when I got home I primed it and painted it white.

Then I hung it (remember you need to leave space behind it for the peg hooks...my assortment kit actually came with rubber spacers, which made it easy).


Then I added my peg hooks.


Then I ended up totally rearranging the peg hooks as I placed the items I wanted to hang. :)

I don't have it fully organized yet, but here it is so far.


(Please ignore the mess on the bottom right.  It's a combination of some stuff that needs to make it onto the board and stuff that needs to find a place to go.)

Tuesday, March 20, 2012

Tooth Fairy Pillows

So, I haven't posted in a while, because I was on vacation!

It was Spring Break time for our local schools, so we decided to load up the family truckster and head to my hometown, Virginia Beach, for a week of friends and family fun.

Before I went though, I had to finish up a few projects.

Firstly, I made some border curtains out of table cloths for a friend's mom's canopy bed.  Pictures coming soon...

Second, I made two tooth fairy pillows for kids of friends.  Aren't they darling?


When I came home, I was greeting by two large boxes of tshirts, sweatshirts, and even a formal gown!  These were sent by an old college friend who is paying me to make a tshirt quilt for her.  I can't wait to see how all of these pieces come together!

Sunday, March 4, 2012

Ribbon Organizer

I'm not a ribbon maniac.  I don't have rows and rows of all of the colors of the rainbow.  But, I do have a small assortment that I store like this:


The problem with this storage method (besides not looking neat and kept) is that I can't easily see the ribbon I have (there are spools under that mess!) and therefore rarely use what I actually have.

One day at Michael's I saw this storage system:

I like how the ribbons are stored at the bottom.  So I decided I could come up with something similar in my craft room.  (But spending a lot less $$ than the $49.99 this storage system costs!)

Here is my existing area:


First, I found a dowel I knew we had in the garage.  (You can find these at the hardware store for like $1.) 

Then I took a thick cloth ribbon I had (in the basket of ribbons)...


folded it in half and measured 3/4 inch...


and sewed a loop.


Then I sewed the top half of the ribbon together also (not pictured).

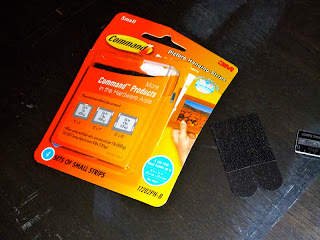
I found some small Command velcro strips in the garage.  (For the record, I wanted to screw them in, but Superman convinced me I should go with these strips.  Only time will tell who was right.)


Stick a strip over where you sewed the strips together...


then trim off the extra. I sewed it on using a basic straight stitch.


 Put the corresponding velcro on, and trim it down also.


Then stick the ribbons up underneath the shelf (obviously measure first).


Then put your spools of ribbon on your dowel, and stick each dowel end into the small loops you sewed.


Total time: 15 minutes
Total cost: $0 (since I used all found materials I already had at home.

Update: I spray painted the dowel black. What do you think?


My next craftroom improvement project will be replacing that dry erase board (I never use) with a pegboard system. Pictures coming soon!