Wednesday, December 18, 2013

Merry KISSmas

My husband has always disliked posing for the cheesy happy family Christmas cards. He has spent the past year trying to convince me that instead of doing one of those cheesy (traditional!) cards, that we do something funny instead. I think I delivered.


I poured over dozens of KISS album covers and marketing materials, making sure the design really captured the KISS style. I think I did alright!

I thought the hardest part would be getting the boys to wear the make-up, but it wasn't a problem at all. They thought it was "like Halloween all over again." And both of them really got into the persona of their rocker characters!

The feedback from our friends and family has been great too. They love the funny card. We might just have to do another one next year. Any ideas for what theme we should do?

Sunday, December 1, 2013

Rock Tshirt Quilt

This post is almost a year late!

Last Christmas, as a surprise present for my husband, I took a bunch of his old concert t-shirts and made a quilt for him. I just realized that I never posted a picture of it!

These aren't nearly all of his concert tees, but these are some of the ones I knew he wouldn't divorce me over cutting up. :)

Front of the rock and roll quilt

Back of the rock and roll quilt

On Christmas morning

Wednesday, August 28, 2013

Imitation Craft: Owl Quilt

I am a Chi Omega, and our symbol is the owl. One of my very best friends is my Chi Omega sister. We met through XO almost 15 years ago. We've been sisters, roommates, BFFs, bridesmaids in each other's weddings, and became mothers around the same time. In fact, we got married months apart from one another and both subsequently had two sons. (I had my twin boys and she had two single sons a year and a half apart.) But now she is pregnant with a little girl and I'm over the moon happy for her to have what we in the sorority world refer to as a "Legacy".

I have made quilts for all of her children (her two sons and her step-daughter), so I knew I was going to make a quilt for child #4. It only took me a few minutes of browsing through pinterest before I happened upon the perfect design!
http://www.etsy.com/shop/barabooboo
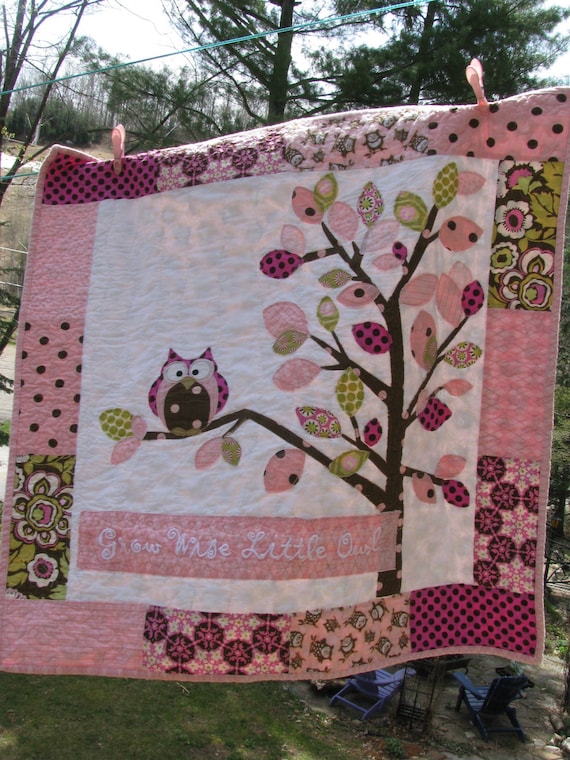
What a perfect, sweet, little baby quilt for a Chi Omega legacy!

I wanted to find some owl fabric to incorporate, so I started at Spoonflower.com. One of the things I love about Spoonflower (other than the ability to customize fabrics!) is that you can search pretty specifically for the design and color you want. I was able to search for owls patterns that used bright pink and green. And many patterns (including the one I settled on) have collections that go together. (However, I ended up just getting the owl fabric because it does add up quickly, but if I had unlimited re$ources, I would have ordered from the collection). Some Spoonflower owl fabrics

Once I got the perfect owl fabric, the rest was easy. What do you think?


And, following with my recent tradition, I also made Baby P a XO legacy onesie to match my BFF's alumni tshirt (that I also made).

And, I realized that I had never made a legacy tshirt for her step-daughter (because she came into our lives a little older), so I went ahead and made one for her too. So now their whole family has matching letters. :)

And because we have another sister who is also expecting a little girl, I made one for her baby too. :)

Thursday, June 6, 2013

Baseball Room

I was looking through some old posts, when I realized that I had post bits and pieces of the boys' baseball bedroom redo last summer (quilt-red, quilt-blue, pillows, coat rack, curtain rods) , but I never posted pictures of the finished product. So I thought it was high time I posted some.

As a reminder, this is what my boys' room looked like before. This is the same fishy/nautical theme they've had since they were newborns.


And this is the updated baseball themed room that we did for their 5th birthday! They LOVE it!


I got the blue black out curtains (it stays light really late in Indiana) on clearance from Walmart.com. I got the posters from Posters.com (and had a 25% your whole order coupon) and the poster frames from Menards. My parents ordered the little red locker-style night stand from Amazon.com. You can't see the alarm clock too well, but it has rainbow colored numbers! I got that from Target. The little lamp is also from Target, but that has since been replaced with a Lillian Vernon baseball lamp from my husband's parents.


We already had the shelves (Menards), but we decorated them some of my husband's old gloves, cleats, and trophies and some of the boys' balls and trophies. What you can't see behind the door is a we hung another old baseball bat and glove, along with and a framed sheet of IU baseball cards (Go Hoosiers!). The wall on the left side of the closet (which you can't see either) is basically a mirror image of the wall on the right, with a shelf on top and filled with double white metal hooks (from Menards) hanging ball caps. (My kids have a lot of ball caps!). I believe we got the baseball piggy bank from Target (or maybe Walmart, I don't remember).

Tshirt Quilt: Hokie Style

A friend's mom recently contacted me asking me to make a tshirt quilt for her youngest son's college graduation. It's a sea of orange and maroon!


Imitation Crafts: Tshirt Re-do

I've had this tshirt refashion on my Upcycling Pinterest board for a while. Then a few weeks ago I ran in a 5K and finally got the perfect shirt to try it out.

All they had left were larges, XLs and XXLs when I got to sign in. I had pre-registered for an XL, but I felt bad that all of these skinny runners were getting stuck with huge shirts, so I voluntarily took the XXL size instead. It is pretty roomy!!


Cut off the arms and the top/neck portion.


Turn the shirt inside out. On the top of front and back, fold down about an inch and a quarter to sew a ditch for running your straps through.


Cut off the reinforced band of the sleeves and use those as straps. Run them through the channel you sewed, then sew them together in one large circle. (Then I shifted the circle so that that sewed part was hidden.


Voila! The armpits are a little low for my taste, but I think that is because the shirt started out too big for me. But still...it looks really cute over a ribbed-under tank and some black running capris. :)


Sunday, May 26, 2013

Upcycled Men's Dress Shirt Take 2

Yesterday's Upcycled Men's Dress Shirt Dress came out so cute, that I raided my husband's closet for another shirt.

Before:


After:

This one is a little bigger, about size 4T/5T (because I used my son's for sizing). And instead of making the top straight across, I decided to make little armholes. I think this will help better with the fit.

Saturday, May 25, 2013

Upcycled Men's Dress Shirt

So, everyone knows I love:

1. Upcycling old clothes
2. Pinterest
3. Making dresses

So, brining my three loves together, this morning I made a toddler dress that I found on Pinterest out of my husband's old dress shirt.

Here is the original dress that I based it on:

http://www.madebylex.com
And here is my version:

I started with this shirt: (My husband is a teacher, and apparently he can't wear this shirt anymore, since it is the colors of the rival high school in town. My gain!)

Cut it up:


Repositioned the pocket:


I was going to do a full tutorial of what I did, because I did do it slightly differently than the original (for instance, I made the top portion buttonable), but I forgot to take pictures during the steps. Whoops!  So, just enjoy my little recipient and her modeling cuteness! 


Friday, May 10, 2013

DIY Maxi Dress

http://imperfectlypolished.com/2011/09/22/diy-maxi-dress/
I've had this dress pinned on my pinterest craft board for MONTHS.

I loved the look, and though it looked simple enough to do. However, I didn't know what tank I would use to make it.

But then finally...inspiration hit!

I have an old red and white tee I used to like to wear with navy blue capris, because it looked very nautical to me. But it had a stain on the stomach area.

And I had an old navy blue jersey dress that had a big oil stain on the chest. (And truth be told, was always too low cut for me to wear without something substantial underneath it.

I followed the instructions on ImperfectlyPolished and voila!


I completed the look by wearing one of my husband's white under-tanks and a white cardigan.

Saturday, March 23, 2013

Dress Apron Tutorial

Back in January, I had a giveaway contest for a little girl's dress apron. I announced that the winners were Rachel and Amanda. Rachel let me know right away what apron she wanted. However, Amanda was waiting for just the right moment, which was just this past week. I decided while making Amanda's apron that I would take pictures as I went so that I could make a quick tutorial for anyone who wants to learn to make their own. I hope you enjoy...


What you'll need:
  • a sewing machine with embroidery unit (embroidery optional)
  • embroidery hoop (optional)
  • tearaway stabilizer (optional)
  • 2 coordinating fabrics
  • thread
Supplies
Step 1:

Figure out what size apron you want to make.

I am making a toddler sized apron, so I used one of my son's as a template for the right size.
Step 1
Step 2: (Optional)

If you are going to embroider the name, I suggest doing it before cutting the bodice from the fabric. That way you can make sure you cut it it around the name, perfectly centered.
Step 2
Step 3:

If you are making a child's sized apron, cut out and iron flat:
  • two 6.5" x 10" rectangles for the bodice
  • one 11" x 44" rectangle for the skirt
  • two 2.5" x 12" rectangles for waist
  • two 2" x 15" rectangles for the neck strap
  • two 2" x 18" rectangles for the belt ties (not pictured)
Step 3
Step 4:

Right sides together, sew each one of the waist rectangles to each one of the bodice rectangles.
Step 4
Step 5:

Pin the bodice/waist combination right sides together, making sure that the waists line up exactly.

Step 5
Step 6:

Before completing this next step, you'll want to sew together the neck strap (two 2" x 15" rectangles) right sides together. Then flip right sides out and sew flat.

I like to fold the bodice in half and cut up a slight curve on the side (I fold it in half so both sides match). Then I cut a slight curve for the neck. (Make sure what's left for the shoulder area line up with the neck strap. See picture.)
Step 6
Step 7:

Sew up both sides of the bodice first.

Then before you sew the top (neck/shoulders area), you'll need to pin the neck strap so that it lines up where it will come together with the bodice.

Remember that you you need to pin it inside because the bodice is currently inside out. And, you'll want to make sure the it isn't twisted, so when you do flip the bodice right side out it will lie flatly around the neck. See picture.

Then, carefully sew across the top, including where the straps meet the shoulders and the curve of the neck.

Then flip right side out and iron flat.

Only the bottom waist portion of the bodice should still be unsewn.

Step 7.1
Step 7.2
Step 7.3
Step 8:

To prepare the skirt you'll need to start by doing small hems on both sides and the bottom.

First fold over over 1/4 inch and iron. Then fold over 1/4 inch again and iron again. Then straight stitch down the hem. (I complete both sides first, then the bottom.)

To gather the top of the skirt, I use my ruffler foot. However, if you don't have a ruffler foot (um, you should buy one, you can find them for less than $20), then you can just gather them as you pin them to the bodice.

Step 8.1
Step 8.2
Step 9:

Since you will be able to see the seem between the bodice/waist and the skirt, I suggest attaching them using either a serger or a french seam.

For this tutorial, I'll assume you don't have access to a serger (they are much more than $20), so I'll show you how to do the french seem.

First, pin the wrong sides together and sew.

Then, flip the apron over, pinning the right sides together and sew.

This will leave a nice clean seam in the back.

Your apron is almost done! You just need to add the belt ties.

Step 9.1
Step 9.2
Step 10:

To finish the belt ties, sew right sides together on three sides (one short and the two long sides). I like to curve my short side, giving them a ribbon-like look.

Turn the ties inside out and iron.

Optional: Top stitch (sew on top of the finished sides) to make the ties stay flat, instead of poofy after a wash.
Step 10
Step 11:

Fold down twice the ends (hiding the open seam) and then pin to the waist so that it attaches on the back/inside. Then sew.

Hint: I like to make sure that the curves of the belt ties are both on the bottom of the ties when I attach them, for continuity.

Don't be afraid to reinforce this sewing by going back over it a few times. These ties will be pulled on and need to be really well attached!
Step 11
That's it! You are finished!

Here is the front.
Front
Here is the back.
Back