Showing posts with label tutorial. Show all posts

Saturday, March 23, 2013

Dress Apron Tutorial

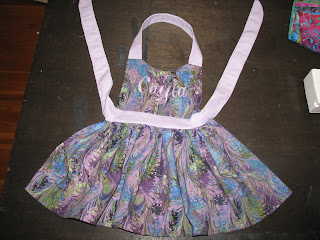
Back in January, I had a giveaway contest for a little girl's dress apron. I announced that the winners were Rachel and Amanda. Rachel let me know right away what apron she wanted. However, Amanda was waiting for just the right moment, which was just this past week. I decided while making Amanda's apron that I would take pictures as I went so that I could make a quick tutorial for anyone who wants to learn to make their own. I hope you enjoy...


What you'll need:
  • a sewing machine with embroidery unit (embroidery optional)
  • embroidery hoop (optional)
  • tearaway stabilizer (optional)
  • 2 coordinating fabrics
  • thread
Supplies
Step 1:

Figure out what size apron you want to make.

I am making a toddler sized apron, so I used one of my son's as a template for the right size.
Step 1
Step 2: (Optional)

If you are going to embroider the name, I suggest doing it before cutting the bodice from the fabric. That way you can make sure you cut it it around the name, perfectly centered.
Step 2
Step 3:

If you are making a child's sized apron, cut out and iron flat:
  • two 6.5" x 10" rectangles for the bodice
  • one 11" x 44" rectangle for the skirt
  • two 2.5" x 12" rectangles for waist
  • two 2" x 15" rectangles for the neck strap
  • two 2" x 18" rectangles for the belt ties (not pictured)
Step 3
Step 4:

Right sides together, sew each one of the waist rectangles to each one of the bodice rectangles.
Step 4
Step 5:

Pin the bodice/waist combination right sides together, making sure that the waists line up exactly.

Step 5
Step 6:

Before completing this next step, you'll want to sew together the neck strap (two 2" x 15" rectangles) right sides together. Then flip right sides out and sew flat.

I like to fold the bodice in half and cut up a slight curve on the side (I fold it in half so both sides match). Then I cut a slight curve for the neck. (Make sure what's left for the shoulder area line up with the neck strap. See picture.)
Step 6
Step 7:

Sew up both sides of the bodice first.

Then before you sew the top (neck/shoulders area), you'll need to pin the neck strap so that it lines up where it will come together with the bodice.

Remember that you you need to pin it inside because the bodice is currently inside out. And, you'll want to make sure the it isn't twisted, so when you do flip the bodice right side out it will lie flatly around the neck. See picture.

Then, carefully sew across the top, including where the straps meet the shoulders and the curve of the neck.

Then flip right side out and iron flat.

Only the bottom waist portion of the bodice should still be unsewn.

Step 7.1
Step 7.2
Step 7.3
Step 8:

To prepare the skirt you'll need to start by doing small hems on both sides and the bottom.

First fold over over 1/4 inch and iron. Then fold over 1/4 inch again and iron again. Then straight stitch down the hem. (I complete both sides first, then the bottom.)

To gather the top of the skirt, I use my ruffler foot. However, if you don't have a ruffler foot (um, you should buy one, you can find them for less than $20), then you can just gather them as you pin them to the bodice.

Step 8.1
Step 8.2
Step 9:

Since you will be able to see the seem between the bodice/waist and the skirt, I suggest attaching them using either a serger or a french seam.

For this tutorial, I'll assume you don't have access to a serger (they are much more than $20), so I'll show you how to do the french seem.

First, pin the wrong sides together and sew.

Then, flip the apron over, pinning the right sides together and sew.

This will leave a nice clean seam in the back.

Your apron is almost done! You just need to add the belt ties.

Step 9.1
Step 9.2
Step 10:

To finish the belt ties, sew right sides together on three sides (one short and the two long sides). I like to curve my short side, giving them a ribbon-like look.

Turn the ties inside out and iron.

Optional: Top stitch (sew on top of the finished sides) to make the ties stay flat, instead of poofy after a wash.
Step 10
Step 11:

Fold down twice the ends (hiding the open seam) and then pin to the waist so that it attaches on the back/inside. Then sew.

Hint: I like to make sure that the curves of the belt ties are both on the bottom of the ties when I attach them, for continuity.

Don't be afraid to reinforce this sewing by going back over it a few times. These ties will be pulled on and need to be really well attached!
Step 11
That's it! You are finished!

Here is the front.
Front
Here is the back.
Back

Saturday, August 4, 2012

Removable TShirt Throw Pillows

Hi! Remember me?

Since my last post, I....

  • finished my online class
  • took a vacation to Myrtle Beach
  • went school supply shopping
  • have been watching lots of Olympics
  • am trying to enjoy the last days of summer by spending a lot of time at the pool! 
Unfortunately, that means I haven't had a lot of time to craft.  Actually, my craft table became the "pile everything here that needs to eventually be dealt with" spot, and for about two weeks I couldn't have told you what color it was...but this morning I finally cleared it off!  Yay!

Todays project: Tshirt throw pillows to match their quilts.

A few weeks back, Superman happened on a box of miscellaneous baseball tshirts in the basement.  At the time, I was actually a little ticked off, since I had actually had to go to goodwill and buy extra tshirts in order to make the quilts the right sizes.  He found enough shirts that I wouldn't have needed the goodwill shirts! Which upset me because #1 I wouldn't have had to pay for those shirts (sure they were $1-$2 a piece, but that adds up!) and #2 I had wanted as much of the quilt to be authentically OUR shirts as possible. But oh well...he suggested I make ANOTHER baseball quilt to take to the minor league games with us (for sitting on in the outfield) which would actually be good advertisement if I really want to start selling them. 

But, before I did that, I wanted to pull two out and cover the throw pillows from their old beds.

Here's how they came out...


I've made tshirt throw pillows before, but not removable covers.  I've since decided I should only ever make them removable...because, um, I have kids!  So these are removable.


I was going to write a whole tutorial on how to make this, but a quick google search and I found this great tutorial which is very similar to what I did. So, I decided not to reinvent the wheel. :)

But I will add the two things I did differently, that I would suggest if you are making one out of tshirts.

1. Quilt the top. Tshirts (especially if they've been worn) can be pretty thin, so I quilted mine with some scrap white jersey I had and some super light batting.

2. Double up the flaps. In the tutorial given, her flaps are a single layer with a hem...I actually double mind up, so that they were sturdier.

I can't wait to post some pictures of the finished room soon!

Saturday, March 3, 2012

T-shirt pants

So, you've made a t-shirt quilt, and you have a bunch of left over jersey material.  What do you do with it?  You don't want to just throw it away.  It seems like a waste of perfectly good fabric.

Or maybe you just have an old tshirt you never wear anymore, but can't quite bear to part with yet.

The solution: pajama pants.

Well, maybe not pajama pants for you.  But definitely pajama pants for babies or toddlers.

Estimated time: 20 minutes

Step 1.  Okay, I didn't do a good job taking a picture of step one.  But just imagine if you will.  You can either start with two tshirt backs (the leftover backsides from cutting out the fronts for your quilt) and fold them in half.  Or start with one tshirt and cut it straight across under the armpits (should leave you a square shape of the bottom of the shirt).

I'm using two tshirt backs for this tutorial.

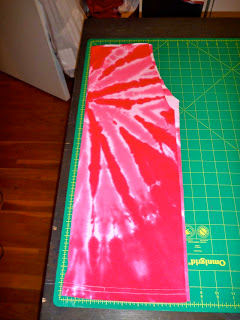
Step 2.  Take a pair of pajama pants and fold them in half, then lay them over your tshirt back (remember it has been folded in half), making sure that the fold is lined up with the outside of the leg (the long straight side).  Then, using a rotary blade, carefully trace around the pants, leaving approximately .25-.5 inch border, if the pants should be the same size.  

My boys are actually close to outgrowing these pajamas (they are definitely high waters), so I left about an inch all the way around, and 3 inches on the bottom.


Step 3: Then flip the cut leg onto the other leg and trim up so that they are the same shape.


Step 4:  Now, unfold the pants and refold them back, but with the right sides (the sides worn on the outside) facing each other.  Pin up the straight line.


Step 5:  Sew up the straight part.  (I use a stitch that is part straight stitch and part zig zag.) 


Step 6:  Repeat for the other leg.

Step 7:  Now, take on of the legs and turn it right side out.  Take the leg that is right side out and slip it into the leg that is still inside out.  You want to line the to legs up so that their seams are straight together.  Then pin the U-shape together (make sure all of the pins are on the same side, whichever side you choose.

This should look like this... Like one big tube lined with another big tube.  Right sides facing each other on the inside.


Step 8:  Slowly sew together the pinned U-shape.  Go especially slow around the seam.


Step 9:  Pull the tucked in leg out.  They should be looking like pants now!  And all of the inside seams should be on the same side and facing out for now.

Step 10:  Measure the recipient's waist.  My boys have 18 inch waists.  So I cut a 19 inch strip of 1 inch elastic.

Step 11:  Fold down the waist of the pants.  I like to measure how much I'm going to fold with the elastic under it, so I know approximately where I'm going to want to sew to leave a big enough tunnel for the elastic.


Step 12:  It's hard to see in the picture, but when I'm pinning, I use two really big pins about 1 inch on either side of one of the seams.  These act as guides to tell me where to start and stop sewing.  You want to leave this opening unsewn, because this is how you are going to get that elastic in there.


Step 13:  Sew the waist you just pinned.

Step 14:  It pin a safety pin (I like to use a really big one) to the end of your elastic, and stick it in the opening you left unsewn on the waist.  Then pull thread it all the way through the tunnel.


Step 14:  When you've reached back to the opening, you should have both ends of the elastic poking out.  First MAKE SURE THE ELASTIC IS NOT TWISTED.  Then, sew the ends together.  Remember, I cut 19 inches for an 18 inch waist, so I want about an inch overlap.


Step 15:  Now sew the opening closed.


Voila!  Super cute, super easy, and completely free pajama pants!

This pretty pink pair goes to a special little lady we are going to visit in Virginia next week.


But don't worry, Thing 1 and Thing 2 got their own pairs too!


And the best part is that this project is so simple, that they HELPED me make the pants.  I'm determined to make sure both of my boys have at least rudimentary sewing skills, as I believe all people should.


So comfy!  Now I just need a super extra giant sized t-shirt to make myself a pair. :)

Monday, February 20, 2012

T-Shirt Quilt Tutorial: Optional


Finally, now that you have completed your t-shirt quilt, you might want to label it somehow.

There are a few different options.
  1. Custom labels (like shown above).  Read more about custom labels here and here.
  2. You can buy some generic labels from the craft/fabric store.
  3. You could print out a label on iron transfer paper and iron it on.
  4. Or, you could just write your name and date made on the back of the quilt with a permanent marker.
And if this is a special quilt, to commemorate a birthday, anniversary, or graduation, etc.  You might want to include either a block on the front (embroidered or iron transfered).

Or if it doesn't fit in with the theme, you can put one on the back side.

T-Shirt Quilt Tutorial: Step 9


The last step to finish your quilt is binding.

First, you need to trim up all of the sides, making sure you have a nice straight line where the top, batting, and backing come together.  To do this, use your cutting mat, rotary blade, and a template/ruler for a straight edge.

See how nice and clean that looks.

If you have never binded a quilt before, I would suggest this tutorial from Mollyflanders.blogspot.com.

You can buy pre-made binding from the craft/fabric store, but I like to make my own.

When machine binding, I recommend sewing the binding to the back side of the quilt first.

Then flip the quilt over and complete the binding.

And...drum roll please....TA-DA!

And the back of the quilt...

Optional step: Labeling