Showing posts with label sewing. Show all posts

Wednesday, May 20, 2015

Throw Pillows - Pinterest Project

Last week, my MIL handed down a gently used sofa and love seat to us. We really needed a new set, but were reluctant to invest in something new, seeing as we still have two very spill prone and messy 7 year old boys! We had been trying to make due with new slip covers, but the key word is SLIP, as in they kept slipping out of place. Anyway, I digress...

New-to-us love seat and couch

I LOVE throw pillows. The more the better. I use them to prop, to lean, the cuddle, to nap on... And I especially prefer the look of lots of random throw pillows over the matchy-matchy-came-with-the-sofa throw pillows. I have had for a while, this vision of making lots of throw covers for all of my throw pillow in cool, unique, matching AND contrasting styles. In fact, I even made a pinterest board called Throw Fluffies where I've been saving up these ideas.

Getting the new set last week was the perfect excuse I needed to start working on this goal. First up: animal silhouette pillows. A while back, I found a blog where someone did her own copy-cat version of a throw pillow design she found at Restoration Hardware, and I really liked them.

Original Restoration Hardware version

Version by lessthanperfectlifeofbliss.blogspot.com

I decided that I'd like to copy her copycat version, making my own version of a gray cat for my cat Persy and a black cocker spaniel for our dog McGarrett.

Persy pillow

McGarrett pillow

I love how they came out! And I can't wait to tackle some of my other throw pillow ideas!

Monday, July 7, 2014

Another graduation quilt

This evening I finished another graduation quilt for a recent graduate. This young lady really liked the hand quilted designs on the blocks, and requested a black backing with white thread, so the designs would be more visible.


This quilt's finished size is 76w x 72h, so it's finished cost is $370 + $15 for an embroidered block with name and graduation date, for a total of $385.


Sunday, June 15, 2014

Graduation Quilt

Tis graduation season!

I just finished one graduation quilt and have started working on another.

When I sent the picture of the finished quilt to the grad, she responded: "THIS IS ABSOLUTELY INCREDIBLE. It brings tears to my eyes seeing it and I cant wait to finally cuddle with it. What a special thing I will have for the rest of my life and I cannot thank you enough for all the time and effort you put into making it!"

This is why I love doing this particular craft so much. It really is a meaningful project that I do believe people will keep and cherish for their entire lives.

Front
Back

Since I often get asked about price, I'll start listing the prices of the quilts. This is a finished size of 76 x72 and so it's finished cost is $370.

UPDATE - Here is a picture with the new grad and her quilt:

Saturday, March 15, 2014

Memory Quilt

When something unimaginable sad happens, like many people, I never know the right words to say. The experts say all you can really say is "I'm so sorry." But sometimes sorry, just doesn't feel like enough. So when one of Superman's co-workers lost her 6 month old baby to SIDS last summer, and I didn't know how to express just how I felt for that mother, that father, and their darling baby... I offered to make a memory quilt from his baby clothes. This was the most touching sewing project I've ever worked on. I hope I never ever have to make another one.


Update: Here is a picture of Cooper's newborn baby sister, his mom's Rainbow Baby, laying on his quilt.

Note: Through this story, I have learned that siblings born after a SIDS loss are usually called "Rainbow babies." I love this term because it means: a beautiful and bright rainbow follows a storm and gives hope of things getting better. Storm-clouds might still be overhead as the family continue to cope with the loss, but something colorful and bright has emerged from the darkness and misery.

Thursday, June 6, 2013

Tshirt Quilt: Hokie Style

A friend's mom recently contacted me asking me to make a tshirt quilt for her youngest son's college graduation. It's a sea of orange and maroon!


Imitation Crafts: Tshirt Re-do

I've had this tshirt refashion on my Upcycling Pinterest board for a while. Then a few weeks ago I ran in a 5K and finally got the perfect shirt to try it out.

All they had left were larges, XLs and XXLs when I got to sign in. I had pre-registered for an XL, but I felt bad that all of these skinny runners were getting stuck with huge shirts, so I voluntarily took the XXL size instead. It is pretty roomy!!


Cut off the arms and the top/neck portion.


Turn the shirt inside out. On the top of front and back, fold down about an inch and a quarter to sew a ditch for running your straps through.


Cut off the reinforced band of the sleeves and use those as straps. Run them through the channel you sewed, then sew them together in one large circle. (Then I shifted the circle so that that sewed part was hidden.


Voila! The armpits are a little low for my taste, but I think that is because the shirt started out too big for me. But still...it looks really cute over a ribbed-under tank and some black running capris. :)


Sunday, May 26, 2013

Upcycled Men's Dress Shirt Take 2

Yesterday's Upcycled Men's Dress Shirt Dress came out so cute, that I raided my husband's closet for another shirt.

Before:


After:

This one is a little bigger, about size 4T/5T (because I used my son's for sizing). And instead of making the top straight across, I decided to make little armholes. I think this will help better with the fit.

Saturday, May 25, 2013

Upcycled Men's Dress Shirt

So, everyone knows I love:

1. Upcycling old clothes
2. Pinterest
3. Making dresses

So, brining my three loves together, this morning I made a toddler dress that I found on Pinterest out of my husband's old dress shirt.

Here is the original dress that I based it on:

http://www.madebylex.com
And here is my version:

I started with this shirt: (My husband is a teacher, and apparently he can't wear this shirt anymore, since it is the colors of the rival high school in town. My gain!)

Cut it up:


Repositioned the pocket:


I was going to do a full tutorial of what I did, because I did do it slightly differently than the original (for instance, I made the top portion buttonable), but I forgot to take pictures during the steps. Whoops!  So, just enjoy my little recipient and her modeling cuteness! 


Friday, May 10, 2013

DIY Maxi Dress

http://imperfectlypolished.com/2011/09/22/diy-maxi-dress/
I've had this dress pinned on my pinterest craft board for MONTHS.

I loved the look, and though it looked simple enough to do. However, I didn't know what tank I would use to make it.

But then finally...inspiration hit!

I have an old red and white tee I used to like to wear with navy blue capris, because it looked very nautical to me. But it had a stain on the stomach area.

And I had an old navy blue jersey dress that had a big oil stain on the chest. (And truth be told, was always too low cut for me to wear without something substantial underneath it.

I followed the instructions on ImperfectlyPolished and voila!


I completed the look by wearing one of my husband's white under-tanks and a white cardigan.

Saturday, March 23, 2013

Dress Apron Tutorial

Back in January, I had a giveaway contest for a little girl's dress apron. I announced that the winners were Rachel and Amanda. Rachel let me know right away what apron she wanted. However, Amanda was waiting for just the right moment, which was just this past week. I decided while making Amanda's apron that I would take pictures as I went so that I could make a quick tutorial for anyone who wants to learn to make their own. I hope you enjoy...


What you'll need:
  • a sewing machine with embroidery unit (embroidery optional)
  • embroidery hoop (optional)
  • tearaway stabilizer (optional)
  • 2 coordinating fabrics
  • thread
Supplies
Step 1:

Figure out what size apron you want to make.

I am making a toddler sized apron, so I used one of my son's as a template for the right size.
Step 1
Step 2: (Optional)

If you are going to embroider the name, I suggest doing it before cutting the bodice from the fabric. That way you can make sure you cut it it around the name, perfectly centered.
Step 2
Step 3:

If you are making a child's sized apron, cut out and iron flat:
  • two 6.5" x 10" rectangles for the bodice
  • one 11" x 44" rectangle for the skirt
  • two 2.5" x 12" rectangles for waist
  • two 2" x 15" rectangles for the neck strap
  • two 2" x 18" rectangles for the belt ties (not pictured)
Step 3
Step 4:

Right sides together, sew each one of the waist rectangles to each one of the bodice rectangles.
Step 4
Step 5:

Pin the bodice/waist combination right sides together, making sure that the waists line up exactly.

Step 5
Step 6:

Before completing this next step, you'll want to sew together the neck strap (two 2" x 15" rectangles) right sides together. Then flip right sides out and sew flat.

I like to fold the bodice in half and cut up a slight curve on the side (I fold it in half so both sides match). Then I cut a slight curve for the neck. (Make sure what's left for the shoulder area line up with the neck strap. See picture.)
Step 6
Step 7:

Sew up both sides of the bodice first.

Then before you sew the top (neck/shoulders area), you'll need to pin the neck strap so that it lines up where it will come together with the bodice.

Remember that you you need to pin it inside because the bodice is currently inside out. And, you'll want to make sure the it isn't twisted, so when you do flip the bodice right side out it will lie flatly around the neck. See picture.

Then, carefully sew across the top, including where the straps meet the shoulders and the curve of the neck.

Then flip right side out and iron flat.

Only the bottom waist portion of the bodice should still be unsewn.

Step 7.1
Step 7.2
Step 7.3
Step 8:

To prepare the skirt you'll need to start by doing small hems on both sides and the bottom.

First fold over over 1/4 inch and iron. Then fold over 1/4 inch again and iron again. Then straight stitch down the hem. (I complete both sides first, then the bottom.)

To gather the top of the skirt, I use my ruffler foot. However, if you don't have a ruffler foot (um, you should buy one, you can find them for less than $20), then you can just gather them as you pin them to the bodice.

Step 8.1
Step 8.2
Step 9:

Since you will be able to see the seem between the bodice/waist and the skirt, I suggest attaching them using either a serger or a french seam.

For this tutorial, I'll assume you don't have access to a serger (they are much more than $20), so I'll show you how to do the french seem.

First, pin the wrong sides together and sew.

Then, flip the apron over, pinning the right sides together and sew.

This will leave a nice clean seam in the back.

Your apron is almost done! You just need to add the belt ties.

Step 9.1
Step 9.2
Step 10:

To finish the belt ties, sew right sides together on three sides (one short and the two long sides). I like to curve my short side, giving them a ribbon-like look.

Turn the ties inside out and iron.

Optional: Top stitch (sew on top of the finished sides) to make the ties stay flat, instead of poofy after a wash.
Step 10
Step 11:

Fold down twice the ends (hiding the open seam) and then pin to the waist so that it attaches on the back/inside. Then sew.

Hint: I like to make sure that the curves of the belt ties are both on the bottom of the ties when I attach them, for continuity.

Don't be afraid to reinforce this sewing by going back over it a few times. These ties will be pulled on and need to be really well attached!
Step 11
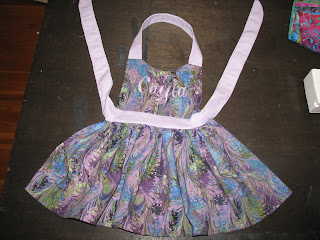
That's it! You are finished!

Here is the front.
Front
Here is the back.
Back