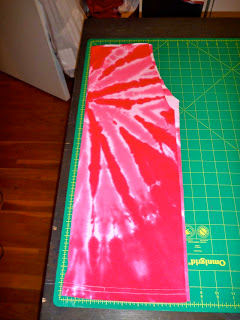
So, you've made a t-shirt quilt, and you have a bunch of left over jersey material. What do you do with it? You don't want to just throw it away. It seems like a waste of perfectly good fabric.
Or maybe you just have an old tshirt you never wear anymore, but can't quite bear to part with yet.
The solution: pajama pants.
Well, maybe not pajama pants for you. But definitely pajama pants for babies or toddlers.
Estimated time: 20 minutes
Step 1. Okay, I didn't do a good job taking a picture of step one. But just imagine if you will. You can either start with two tshirt backs (the leftover backsides from cutting out the fronts for your quilt) and fold them in half. Or start with one tshirt and cut it straight across under the armpits (should leave you a square shape of the bottom of the shirt).
I'm using two tshirt backs for this tutorial.
Step 2. Take a pair of pajama pants and fold them in half, then lay them over your tshirt back (remember it has been folded in half), making sure that the fold is lined up with the outside of the leg (the long straight side). Then, using a rotary blade, carefully trace around the pants, leaving approximately .25-.5 inch border, if the pants should be the same size.
My boys are actually close to outgrowing these pajamas (they are definitely high waters), so I left about an inch all the way around, and 3 inches on the bottom.
Step 3: Then flip the cut leg onto the other leg and trim up so that they are the same shape.
Step 4: Now, unfold the pants and refold them back, but with the right sides (the sides worn on the outside) facing each other. Pin up the straight line.
Step 5: Sew up the straight part. (I use a stitch that is part straight stitch and part zig zag.)
Step 6: Repeat for the other leg.
Step 7: Now, take on of the legs and turn it right side out. Take the leg that is right side out and slip it into the leg that is still inside out. You want to line the to legs up so that their seams are straight together. Then pin the U-shape together (make sure all of the pins are on the same side, whichever side you choose.
This should look like this... Like one big tube lined with another big tube. Right sides facing each other on the inside.
Step 8: Slowly sew together the pinned U-shape. Go especially slow around the seam.
Step 9: Pull the tucked in leg out. They should be looking like pants now! And all of the inside seams should be on the same side and facing out for now.
Step 10: Measure the recipient's waist. My boys have 18 inch waists. So I cut a 19 inch strip of 1 inch elastic.
Step 11: Fold down the waist of the pants. I like to measure how much I'm going to fold with the elastic under it, so I know approximately where I'm going to want to sew to leave a big enough tunnel for the elastic.
Step 12: It's hard to see in the picture, but when I'm pinning, I use two really big pins about 1 inch on either side of one of the seams. These act as guides to tell me where to start and stop sewing. You want to leave this opening unsewn, because this is how you are going to get that elastic in there.
Step 13: Sew the waist you just pinned.
Step 14: It pin a safety pin (I like to use a really big one) to the end of your elastic, and stick it in the opening you left unsewn on the waist. Then pull thread it all the way through the tunnel.
Step 14: When you've reached back to the opening, you should have both ends of the elastic poking out. First MAKE SURE THE ELASTIC IS NOT TWISTED. Then, sew the ends together. Remember, I cut 19 inches for an 18 inch waist, so I want about an inch overlap.
Step 15: Now sew the opening closed.
Voila! Super cute, super easy, and completely free pajama pants!
This pretty pink pair goes to a special little lady we are going to visit in Virginia next week.
But don't worry, Thing 1 and Thing 2 got their own pairs too!
And the best part is that this project is so simple, that they HELPED me make the pants. I'm determined to make sure both of my boys have at least rudimentary sewing skills, as I believe all people should.
So comfy! Now I just need a super extra giant sized t-shirt to make myself a pair. :)


No comments:
Post a Comment